Pages

Showing posts with label Tessuti. Show all posts

Tuesday, 1 December 2020

Simplicity 1366 x 2

My SewJo has finally started to return...not sure what has bought about this comeback but perhaps it's due to hanging out with sewing friends; or just feeling like I have the mental & physical space at home to finally get a bit creative.

I bought this fabric after seeing it on Maai Designs Instagram page (@maaidesign). I had no idea what viscose spandex crepe felt like but who cares - the print (a Lady McElroy design) is fantastic and it had been so long since I felt quite excited about sewing so...Add. To. Cart! 


I decided to sew Simplicity 1366 as it is a TNT so I knew it would be fit. This was a pretty stressful sew however. I was so worried about messing this up that I jinxed myself. It looks okay from the outside but it's a different story inside. The fabric is so light weight - like sewing with stocking material - I was expecting the fabric to be heavier and it has not turned out as nice as I had imagined. I've not worn this yet...and I'm not sure if I will.


A bit of lunchtime and after work sewing last week resulted in another a new Simplicity 1366. This is a more cropped length for wearing with wide-legged pants and more voluminous skirts. I do have this tee already in black (my very first Simplicity 1366 but God knows where it is though). The fabric is a small cotton/elastane remnant bought from Tessuti quite awhile ago. 

Do you like this necklace? The pendant was made in about 5 seconds by Wendy @sydneyjewelleryschool in a recent wire-working class.


----
Size: 18
Modifications:  For the "faces tee" added 7.5cm to the length, added 1cm to both the side of the front and back neckline and dropped the front neckline a bit. Shortened the sleeves by 5cm. For the "black tee" - I think this is the original length, added 1cm to both the side of the front and back neckline and dropped the front neckline a bit. Shortened the sleeves by 10cm. 
Fabric:"faces fabric" viscose spandex crepe from Maai Designs. Black fabric is a cotton/elastane remnant from Tessuti. 
Changes for next time: none

Tuesday, 20 October 2020

Mandy Boat Tee (x 2)

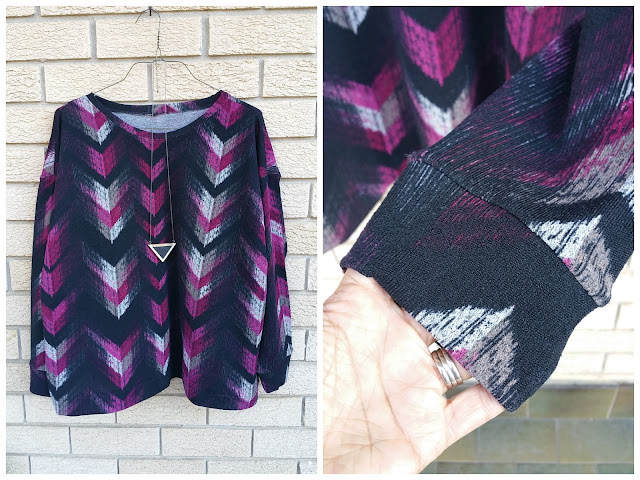
Here we have two Mandy Boat Tees - a free pattern from Tessuti that has recently been re-released as a multi-sized pattern over it's old "one size fits some" iteration. I've sewn quite a few of the old and new versions of this pattern - and in both versions I have modified the boat-neck finish to allow me to use a neckband to finish the neck. I find this a much neater way to finish the top and also feel it extends the longevity of the garment as the fold-over boatneck never keeps its shape on my tops. 

This black and white fabric is a "sweater knit" donated to the recent fabric destash I attended - donated by @LynneSews.  I don't think this fabric had great "hanger appeal" but sewn up I really like it, REALLY like it. The sleeves are a smidge too tight but I think that is a result of the fabric and its level of stretch. 


The fabric for this second Mandy Boat Tee was another donated to the fabric destash, this time by @NatashaSews. It's an absolutely lovely viscose-type knit -- I'm not sure why it was donated as it's so pretty but I pounced on it as soon as I saw it. This top fits well and is very comfortable but annoyingly I sewed the neckband on backwards so the join is at the front 🙄🙄🙄 - but the fabric thankfully hides this quite well....

---

Pattern: Mandy Boat Tee by Tessuti
Size: Size 4
Modifications: lengthened by 4cm. Also, added a neckband.
Fabric: B&W sweater knit donated to the fabric destash by @LynneSews (orignally from Fabric Deluxe)
Fabric: Floral knit donated to the fabric destash by @NatashaSews (originally from Pitt Trading)
Changes for next time: none

Wednesday, 29 July 2020

Cropped Kyoto Vest

I made my first Kyoto Vest back in June 2017 and it has been a wardrobe workhorse since then (though not this year as I've not actually left the house to go to work during winter at all). I remember back in 2017 thinking a short, black Kyoto Vest would be great for wearing over dresses.

I was sure I had bought the boiled wool and wool binding for this short version but could not find it anywhere so embarked a new project with some boiled wool from a fabric swap (didn't have enough fabric so had to piece it together) and some poly-binding kindly donated by Amy (thank you for being so generous Amy). The binding was a bit too stiff so I ended up putting the project aside.

About 4 weeks later I was rearranging my sewing storage and found the wool and binding I had been storing since 2017 and now we have a black, short Kyoto Vest. The wool binding is from Ribbon Kids on ETSY - I 100% recommend them as they are very reasonably priced when compared to what is available in-store here.

I do like this but, for me, it's not as comfortable as the longer version for some reason. I made the armholes bigger than the pattern provides - but I think they could've been a bit bigger still. The armholes on the unaltered pattern feel very high and small. Don't tell anyone but I have kind of stretched the armholes a bit just by pulling on them (shhh, don't tell).


It seems like such an effort to get properly dressed with hair and makeup done just for a few blog photos so here I am in a tunic I would wear to work; worn over tracksuit pants with three day old hair and no make-up anywhere near this face. Living that Covid-19 life.


------
Pattern: Kyoto Vest by Tessuti
Size: XL, shorter version
Modifications:  made the arm holes bigger (but not big enough)
Fabric: boiled wool from Tessuti (I think) & wool binding form Ribbon Kids on ETSY
Changes for next time: none...except for the armhole modification

Friday, 2 November 2018

The new old Mandy Boat Tee

I've been sewing Tessuti's Mandy Boat Tee for over four years  (and 20kgs ago). I made my first one in a class at Tessuti and the pattern was WAY too small for me then - one size does not fit all! Back then the teacher modified the pattern to fit me by making the sleeves and arm holes bigger. It was my go-to top pattern for years but recently, with the...ah...fullness of my biceps getting..fuller...it just didn't really fit anymore *sad face*.

Just recently Tessuti re-released the pattern and it now includes four sizes. I decided to give the size 4 a go. I wasn't feeling optimistic as the new sleeve pattern was the same size as the modified one I had from my class all those years ago. HOWEVER....I'm very please to say that the new pattern fits me very well! Whilst the sleeve pieces are the same size as my old pattern the shoulders on the size 4 are dropped more so the sleeve/armhole join no longer hit me at the fullest part of my arm.


I've worn this top a few times since finishing it a few weeks ago and I really like it. The length is as drafted and it works well with my current wide-legged pants obsession.

The fabric* (some sort of viscose knit) was a nightmare to work with but the print is great. I bought the fabric on a Spoolettes shopping trip to Cabramatta a few weeks ago - $7/meter. It was cut badly and was off grain but I like the end result so the pain of sewing it is a distant memory.


Of course when you make something you like you back it up straight away by sewing a second one! I added an inch to the length of this one but sewed a 2" hem (I didn't like the mean little hem on my first make). Despite my sad face in these photos I LOVE THIS TOP. The fabric* (some sort of viscose knit) was bought from the markets in Hanoi so has good memories attached to it. It's been in my stash for 18 months and I'm glad to finally have it made into something I like.


Here's a close up of the fabric - cute, right? And it looks extra cute with the twee little birdie necklace.


Of course two of these tops is just not enough so I'm in the process of sewing up a black one. It,s going to be too hot soon to wear them but I'm hoping they'll work from my trip to Taipei at NYE.

* both of these fabrics are very light, drapey and quite stretchy. If I was to make this pattern in something with less stretch I'd probably not be quite so happy.

------

Wednesday, 20 June 2018

A (new) York Pinafore

Wow, it's been a REALLY long time between sewing project and blog posts. I have just NOT been feeling the sewing love recently and despite that I did sew two Mandy Boat Tees that had failed in a spectacular way (here and here) so that put me off sewing even more. One problem is that over the summer my arms seem to have expanded (probably due to overeating and not the humidity) so the sleeves on the Mandy Boat are too tight unless I use some crazy, super stretchy fabric. Hmmm....

However...I had kind of been feeling like perhaps I should be sewing something rather than spending all my free time binge watching Outlander and Scandal but couldn't think of what. I had seen the release of the York Pinafore pattern by Helen's Closet but dismissed as "not for me, not my style" until I heard her talking about it on her podcast...it seemed like a simple sew, in my size range and I had some fabric in the stash that would be perfect for it (a long sold out Cotton/Elastane Stretch Woven Velveteen from Tessuti that I had leftover of from another project). Thus...here we are!


The pattern comes with two options for different types of "patch pockets" but I decided to go sans pockets as I felt it would make the pattern more "streamlined" and also because my sewing is not that neat or straight and dodgy pockets will make the pinafore look homemade in the worst kind of way. I was also jumping right in with my "good fabric" and fitting pockets into a side seam was more than I could bear as it meant basting...ugh ugh. Turns out that was a good decision as I ended up taking in the side seams but 0.75cm each as the cocoon shape was just too much fabric at my hips. I have been thinking about going back and perhaps adding in the kangaroo pocket so watch this space.


Overall this project was a quick and satisfying sew, made even more so by leaving off the pockets. Using bias binding is always super fiddly and slow but it does give a pleasingly neat result that makes me smile smugly whenever I look at it.


I sewed the largest size there was (XXL), and also added an inch to the upper bodice straps to account for a bust size that is bigger than the pattern is drafted for. There are two neckline options and I sewed the more scooped neck version. I ended up taking in the side seams about 0.75cm as it was just too big and I would like to straighten up the seam around the hip area as there's just too much fabric there making me feel bigger than I am. I sewed the longest length available but am going to unpick the hem and take things up about an inch or so.

The VERDICT: Whilst I like the concept of this pinafore what I really hate WITH A PASSION is layering . I hate wearing multiple layers with things riding up and down and me constantly adjusting my clothes. I wore this out to a family do on the weekend and I felt so fat and frumpy. I'm willing to give this another try though once it's shorter and slimmer at the sides; and I'm even thinking of making one in denim that I think would be better to wear in warmer weather - no tights = less layering!

---

Size: XXL
Modifications: a
dded 1" to the upper bodice straps for a large bust. Took in side seams about 0.75cm.
Fabric: 
Cotton/Elastane Stretch Woven Velveteen from Tessuti
Changes for next time: sew a smaller size/straighten up the hip; reduce the length. 


Saturday, 10 March 2018

Papercut Patterns - Sway Dress

This make is a TOTAL departure from what I usual sew or wear...a dress in woven fabric! Who am I anymore?

I think I've mentioned before that I am feeling a little bored with sewing. I can't quite put my finger on why but it's probably a lot to do with sewing the same thing all the time (simple knit garments) and that my skills are not really progressing - I'm not even sure I've learned anything new in years. I have a bit of a mental block with learning - I think things are hard and that I am not clever enough to work them out. Plus I'm lazy. Blah blah blah...


Anyway - I started thinking that I would like to make a non-knit dress. It would have to be sleeveless as I KNOW that I hate tight things on my arms. I didn't really mind too much if the dress didn't actually fit because I wanted to learn something new (not zipper or buttons new mind you). I settled on the Sway Dress by Papercut Patterns as there was a chance it could fit me (spoiler alert: it does) and it has a full-facing installed using the "burrito method" which has never crossed my sewing path before, along with a v-neck, belt loops and self-fabric belt.


All in all this was a fairly simple sew though I did find getting a nice clean point around the v-neck tricky. I also had a bit of trouble understitching the facing around the neckline so to make sure things don't flap around up there I also top-stitched the neckline down.


I felt that when it came to making the burrito for my facing the instructions were quite....brief. I read that part of the notes about 20 times and just thought WTAF every time. I nearly gave up at that point, but I put out a cry for help on our Sydney Spoolettes facebook page and someone sent me a very useful YouTube link (thank you Evelyn). It was actually not very difficult but it really isn't until you pull the fabric through on itself you see that's worked (I have no idea how it worked, it just did)!


I am also pretty chuffed with my belt loops. I was going to leave them off (lazy) but thought I should add them as a) it's a learning experience and b) they might actually be useful. I found them quite fiddly to make so after a few attempts I made them longer than suggested, stitched them up and cut off the excess (they are still 1cm longer than drafted). The belt was quite easy although Dave turned it inside out for me as I was struggling.


Also, pockets!

So, the fabric! This is from Tessuti and they are selling it for $15/pm as part of their Skylines Sewing Competition. I was looking for a linen for my Sway dress and this came along at just the right time. The fabric is 63% cotton, 16% linen, 20% viscose and 1% elastane - it was nice to sew with and held a press well. It was impossible for me to tell the right side from the wrong side so I didn't even bother with it. I wasn't going to submit my dress to the competition but in the end I'm pretty proud of this make - I think it's well made so why not?

The big question now is, belted or unbelted I know which I prefer)?

----

Pattern: Sway Dress by Papercut Patterns
Size: XL
Modifications: none
Fabric:  Skylines - 63% cotton, 16% linen, 20% viscose and 1% elastane from Tessuti.
Changes for next time: none, although I think a more drapey fabric would be better

Friday, 5 January 2018

A Mandy Boat Tee (Jumper)

I've been finding the sleeves of Tessuti's Mandy Boat Tee a wee bit tight on my upper arms thus my last few makes haven't been that comfy. The shape of the sleeve piece curves in quite a bit so I thought if I straightened it up it would give me more room where I needed it - and it did! The sleeves are already modified a little bit from when I did a class with Tessuti (ages ago) - so this is just taking the alternation a bit further. Changing the shape of the sleeve piece worked well and I now have a top that is comfortable to wear.


I decided to make a long sleeve type jumper from a fabric I bought in Tessuti with the idea of taking this to Japan with me on my recent holiday. I had bought this fabric for a specific project but I cannot for the life of me remember what that was...so instead we have this top.  Whilst it's a pretty print, the fabric snags on EVERYTHING so I cannot imagine it having a long life span. Even the rough skin on fingertips causes the fabric to snag and pill. It caught on the feeddogs on my sewing machine...you get the drift.


Here I am in a public bathroom in Tokyo taking a selfie of my top. I only wore it once as I don't really like it. There's the fabric issue, but I also made it shorter than I normally do so it meant I didn't want to wear it with my tight ponti pants which made up the bulk of the pants I packed for the trip.


I've also started adding a neckband to my Mandy Boat Tee's - I just think it looks nicer.


----

Pattern: Mandy Boat Tee by Tessuti
Size: One size fits...most
Modifications: lengthened by 7cm (but hemmed at about 2"), the sleeves/arms made bigger for me a sewing class I did at Tessuti plus the extra alteration mentioned above. Also, added a neckband.
Fabric: knit from Tessuti
Changes for next time: none

Tuesday, 14 November 2017

Sewaholic's Rae Skirt

Instagram tells me that I started this Sewaholic Rae Skirt on the 19th August 2016 and I just finished it this weekend - so that's oh, 15 months? Talk about slow sewing!


I have no idea why I gave up before last summer but it seems like a dumb move on my part as I think it would have been a useful addition to the wardrobe, and I could've also taken it to Vietnam with me.  

I think I decided making the waistband casing for the elastic was a pain, and then I always stumble with elastic (finding the right kind that's soft and comfy, making sure it's *just* the right length. I thought the Chambray (bought from Tessuti Fabrics) would be too poufy but I think it's ok now that I see it on myself (with my #simplicity1366 top in a knit). Also, please note this is NOT A KNIT. 


This is a fairly simple sew, aimed at beginners as it's sans nasty zippers and button holes. The skirt has quite a few panels that reduce the poufiness of an elastic waisted skirt and I think I slowed things down by top-stitching down each seam but it does mean that things will sit nice and flat when I wear it. 


And a note to say that my waist measurement is MUCH bigger than the biggest size shown here so if you're curvy this could work for you. 

-----

Pattern: Sewaholic Rae Skirt
Size: 16
Modifications:  
none.
Fabric: 
Chambray (bought from Tessuti Fabrics)
Changes for next time: none, though perhaps a bit longer would be good

Monday, 16 October 2017

A new lease on life - Simplicity 1366

This fabric was made into a Maria Denmark Kristen Kimono Tee at the beginning of 2016 (post here). It got a lot of wear back then but not so much these days. I had bought a bit extra (like 90 cm) of the fabric as I wanted to remake the tee with a neckband this time (I have a BAD habit of re-buying fabric so I can have a do-over, so silly) but a few weeks ago I decided to re-purpose the fabric from the original tee and combine it with my 90cms to make another Simplicity 1366.


I added about 3cm to the hem of the top to make it just a fraction longer so I can wear it comfortably with pants or pencil skirts. I wore it out today (after finishing it today) with my culottes and think the length worked really well. That said I do really like the length of the first Simplicity 1366 tee I made as it's good with fuller skirts.

The neckband is top stitched with a longer straight stitch as are the sleeves (the stitching on those is a big...messed up, I think the thread was playing up in the bobbin). The hem is done with a zigzag to ensure it has some stretch.


Just look at that neckband - they still make me as nervous as anything so I'm always pleased/shocked when they work out well!


----

Pattern: Simplicity 1366
Size: 18
Modifications:  
added 7.5cm to the length, added 1cm to both the side of the front and back neckline and dropped the front neckline a bit. Shortened the sleeves by 5cm.
Fabric: 
Fantasia (Italian printed - 97% Viscose + 3% Spandex jersey knit)
Changes for next time: none

Tuesday, 13 June 2017

Kyoto Vest by Tessuti (and me!)

This is a new pattern from Tessuti - a vest that can be made out of either boiled or non-boiled wool. I saw a sample of this in their Chatswood store last year and was really excited when it was released last month. I love the simple style of it and it is something I would definitely wear.


I had initially cut out some of my very precious non-boiled wool, bought in Kyoto, for this vest. Despite TWO attempts I could NOT get the yoke and neckpiece to fit together at the corner pivot point - the pieces just do not fit for me. At first I thought it was me - and that my printing/cutting out of the A4 PDF was off. Thus I went to Officeworks, had the pattern printed in A0, cut out a new lot of fabric and tried again -- only to have the exact same problem (I was super accurate in all of my cutting just FYI). Both of those pieces of fabric are now balled up in a box -- I'm so angry that I've ruined/wasted good fabric that I can't bring myself to look at it all again.

Anyway - always a sucker for punishment I wanted to try one last time in a boiled wool as the way it is put together is different that for non-boiled wool. I did get the pieces together, but it wasn't as easy as the Sydney Jacket (where the same sort of collar/yoke/pivot point thing is happening) - but I got there in the end. My stitching was pretty wonky from torturing the fabric, and there were a few rows of it and it looked BAD. I decided to try a fancy stitch on my sewing machine to try and hide it...and below is what we have. I actually quite like it - more than the a simple straight stitch.


The pattern is just one piece, and once you've got the collar attached to the shoulders all that is left to do is add 5m of wool binding to it. You could leave the boiled wool unbound and I think, for the cost of wool binding, this is what I might do if I ever make this again (I'm tempted by the short version, to wear with dresses). The in-store samples at Tessuti show some pretty neat, close to the edge stitching of their binding. Mine isn't quite as neat or tidy, but it's doing the job and looks OK (from afar). 


I made no changes to the pattern other than make the armholes a bit bigger - I could tell from my two x bodged versions that I needed more room - so I guess something good came out of it.

Now the fabric...isn't it great. It's from LOOM in Bowral and I ordered it over the phone when I saw them post it on their Instagram account. It's quite...scratchy, but the sort of thing I can wear in cooler weather without too much bother. It's totally reversible too - and the way the jacket is constructed means you can wear it either way.


The photos of me in the vest is how I wore it to work today...it's held closed with a kilt pin to stop it flapping about.

Will I make this pattern again? Maybe. I quite fancy a shorter version and as that only takes 90cm of fabric it's not a big cost investment. Mentally though...am I up for it? 
------
Pattern: Kyoto Vest by Tessuti
Size: XL, longer version
Modifications:  made the arm holes bigger
Fabric: boiled wool from LOOM
Changes for next time: none...except for the armhole modification

Tuesday, 30 May 2017

542 Ebony Tee's

I eluded in my other post from today that I've been on a bit of an Ebony Tee bender...I haven't made 542, but it sure feels like it!

This first top was meant to be a dress, but based on the length of the tee I thought it too would be really short. I went about adding 2" to the length which also entailed adding width. Short version - WAY too big and sack like and WAY too long. I decided to just turn it into a tee rather than faff about taking in the sides. It's a different shape to my other Ebony Tee's as I just cut along one of the stripes and then rolled the hem...it's dipped at the sides and shorter at the front/back. The fabric is from the Hoi An Central Market - I was very sad when I thought I'd ruined the garment, but I actually wear it a lot despite wondering if it was too short at the front/back. Who knew?


The next three follow the pattern, with my usual modification of adding 6.5" to the length. As we're heading into winter I also added 1" to the sleeve length as "bracelet length" = cold wrists and we don't want that. This fabric is from Tessuti -- a viscose elastane jersey. It's actually quite thin fabric so perhaps not really right for warmer weather - but it's pretty and I like it. Again with the rolled hem (because I LOVE it)!


More fabric from Tessuti - that you'll recognize from this Marianne Dress. I liked the print so much I bought more of it with the intention of making a Mandy Boat Tee but that pattern isn't really working for me at the moment due to tight sleeves and too high neckline. I wore this out to dinner on Saturday night and it felt sufficiently fancy whilst still being very comfy. 

And, lucky last (for now)! I bought this fabric from Darn Cheap Fabrics -- either the last trip or the trip before? No idea what it is other than it's stretchy, and cozy. I bought it with the intent of making an Our Fave Top -- but the sleeves on that are also too tight and the neckline too high, ergo this top was born. The fabric is quite thick and I almost feel like I'm wearing a PJ top. I'm not quite sure how I feel about this top yet...


And that's all for now. I really like this pattern (oh, really?) so I'm sure there will be more in my future...

------
Pattern: Closet Case Files "Ebony Tee"
Size: 16
Modifications:  added 6.5" to the length. Rolled hem. These all have 1" added to the length of the sleeve.
Fabric: as above
Changes for next time: none for View B? 

Monday, 6 March 2017

Sewing for holidays

I'm off to Vietnam for two weeks in April. The tour I'm on goes from Hanoi down to Saigon - and it's going to be pretty hot and humid as it's the beginning of their very hot season.  I do have quiet a few casual dresses for summer, most of them sleeveless. I've read that in Vietnam it's polite to have your shoulders covered so I thought, in a first for me, that I'd sew a few dresses for the trip.

I'm going to sew up a few Gabby Dresses, and possibly take the Marianne Dress I sewed over my Christmas break. I'll also take a few of my ready-to-wear dresses to pad things out a bit.

The first Gabby Dress is made from a remnant I bought from Tessuti a few years ago. I never really knew what to do with it as the big flowers ran along the selvage...so I'm glad to have found a good for it. The fabric is a lightweight 94% Viscose/ 6% Spandex blend and I hope it can stand up to the hot weather. As it's cut along the warp it does tend to "grow" during the day so it's one that I cannot hang up - it lives folded in my cupboard.


Next up is another Gabby Dress in a modal/silk jersey blend.  The fabric feels SO THIN (so will be good for the hot and humid weather especially in Saigon)! It's interesting sewing the same dress in different types of knits. This one was taken in so much it's probably an M as opposed to my normal XL. I took the one in above a quite a bit too - so I'll say it's an L...it was also VERY long (and has a 2" hem, as opposed to my normal 1") making me think the dress stretched out somewhere along the way whilst sewing?

I think the neckband could be a smidge tighter on this one -- but the fabric was quite fiddly, reminiscent of the Liberty jersey I sewed up last year, so I didn't want to unpin it once I'd finally attached it ready to sew. Sadly, despite pre-washing, the dress shrank in the wash so I'll be going in the Vinnie's bag and not my bag for Vietnam. I tried to stretch it out when wet but it didn't work.


Straight off the back of this I had THREE fails. One, the fabric was too off-grain to work with (annoyed), another I was sewing when tired and just fluffed it up in about a hundred different ways, and then another with lovely fabric but not enough stretch to make the sleeves comfortable enough to wear (it will become a tee next summer).

And...this is successful dress #2 (that I made twice due to fluffing it up when tired - lucky I have 6m of this fabric from Pitt Trading). The fabric is a viscose and spandex knit and is quite light. It was OK to sew - a bit fiddly as it did curl a little bit but nothing too major.


 This dress is very comfy and will definitely be coming with me - it feels nice and cool to wear!

I've gone to so much effort (six dress and only two wearable) so I hope the Vietnamese appreciate my covered shoulders!

----

Pattern: "Gabby Dress" by Tessuti
Size: XL
Modifications: lengthened by 5cm, neckline cut lower
Fabric: various
Changes for next time: none

Wednesday, 15 February 2017

Experiments in leather with the "Essential Wristlet"

Spurred on by the raging success of my first, I've made myself another "Essential Wristlet" by Dog Under My Desk - this time experimenting with some leather I had bought in a $5 scrap bag from The Fabric Store. The idea stems from this True Bias tutorial and some purses I've seen made up over on Instagram using the tutorial.

I know black leather on dark blue denim isn't "the best look" (tan leather would look better) but it's what I had on hand to play with, and I was hoping that if the purse worked out I can use it for my Sydney Frocktails clutch (which is coming up this Saturday).

The leather was very soft and didn't add much bulk to the purse, was easy to sew with and easy to turn through the lining. I curved the bottom corners (as that's what the purse in the tutorial is like) which made it easy to have nice bottom corners.


I also added in the second zipper option this time. LOVE it. I'll probably cart my phone, lip goop and train pass in here - three things I access a lot.

I found my Flamingo Purse a tad on the small side so at the advice of my sewing friend Cassiy I increased the size of the purse by printing it at 150%. I also then added a bit more depth to the bottom of the purse to account for the curved corners.


I like having a card slot in my purses so thought I'd made use of my leather and add in three! They are not particularly neat (partly due to the fact that I cut my leather out with scissors which is a bit messy {need to get myself a rotary cutter and metal ruler}), but they do the trick.


And just for a bit more *bling* I added in these cute zipper pulls to the zippers that I picked up from Spotlight in Castle Hill (which is the BEST store just FYI, unlike their Bondi Junction store which is THE WORST). If you have keen eyes you'll notice my zippers are going in two different directions here - whoops! Must pay better attention next time.


I love the way this purse turned out and am already in the process of making a second...leather included!