Pages

Wednesday 29 June 2016

Linden Sweaterdress - sucess!

Huzzah *high fives self*!

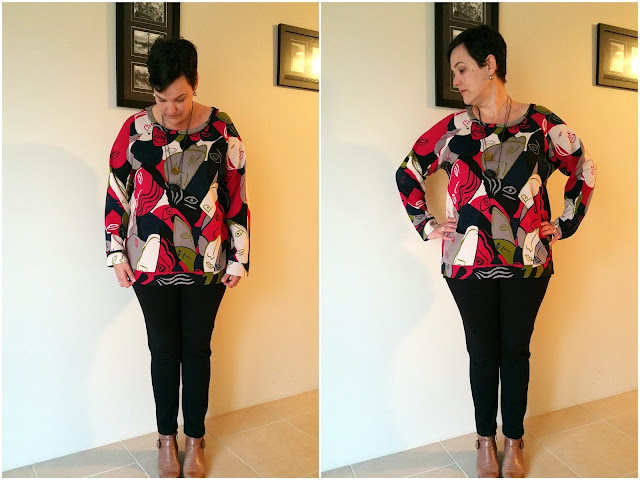
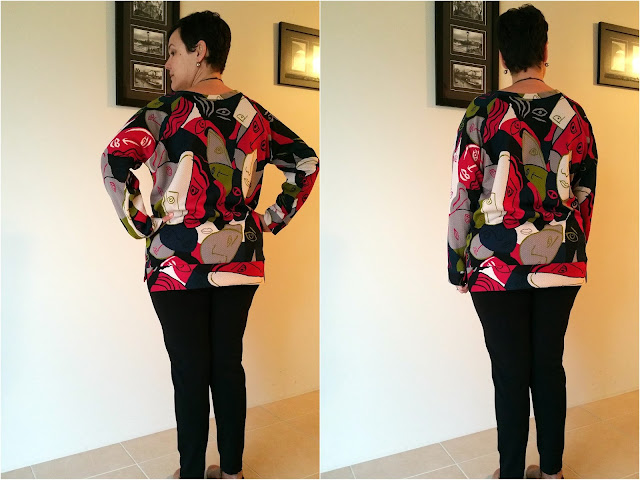
My second foray into the land of the Linden Sweaterdress has been an unreserved success. If I sound pretty happy/smug it's becuase I am! Rarely does a sewing project turn out perfectly for me and this is one of the times where it's all worked out.  Sewing went smoothly (even the neckband went on with no troubles) and it's resulted in something that is exaclty what I wanted. Plus, it's pretty comfortable too (note: nothing is every really 100% comfortable on me as I have some nerve damage in my shoulder due to over 20 years working at a computer -- so "pretty comfortabe" is as good as it gets)!


After my toile, I decided to downsize to a size 16 all over. I had considered grading out to a size 18 at the hips/waist but in the end I thought I should just reduce the size overall...this reduced things quite consdierably, but the dress is still looseish and it would've been a mistake to make it any bigger.


I also chopped 1" off the length of the dress which again I think was a good move. This the sweater pattern was lenghted by 9" to make it to a dress length. For the record I'm 172cm tall - and 9" extra was plenty.
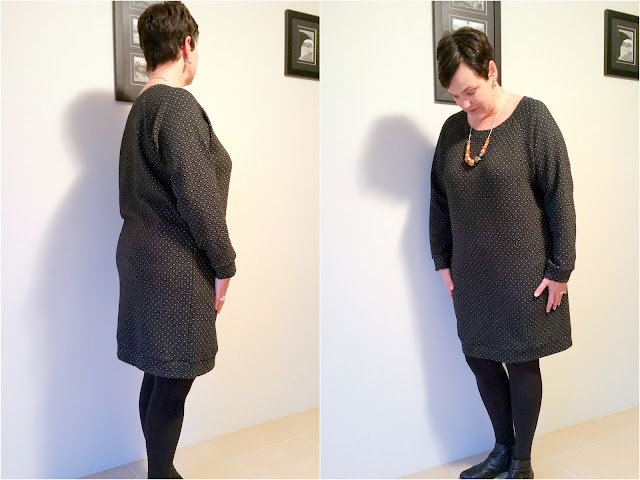

These photos are pretty bad - again it's winter in Sydney and it was very dark and gloomy when I quickly took these photos before work. Below is a picture from the Tessuti website showing my lovely, cosy, snuggly fabric.


---

Pattern: "Linden Sweatshirt" by Grainline Studios
Size: 16
Modifications: lengthened hem by 9"; sleeves shortened by 1", added 1cm to the width of the neckband plus 3" in length
Fabric:  Diamonds On Grey from Tessuti - a Grey/Black Italian Stretch Embossed Jacquard Knit Poly/Wool/Elastane
Changes for next time: nothing - it's PERFECT!
Saturday 25 June 2016

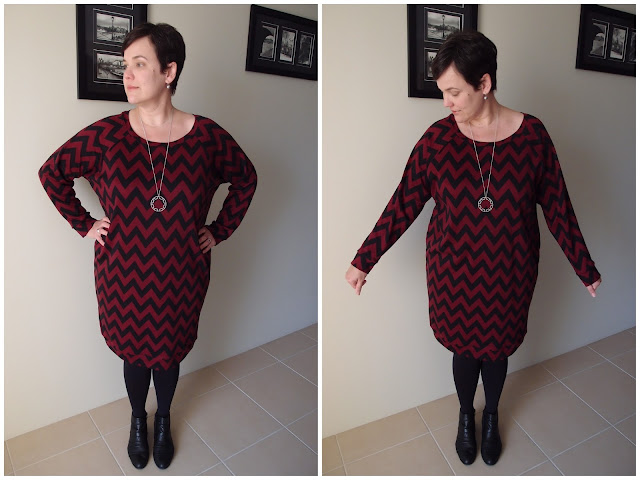
Linden Sweaterdress - an experiment

I've been trying VERY hard this winter to find some casual style tunics or dresses for weekend wear - no luck in the shops, and to date I've not had a lot of luck sewing dresses either, Gaby Dress aside.

After I finished my last Linden Sweatshirt I started to think about adding length to the pattern and making it into a dress. A quick rummage in the stash unearthed some weird "ponti" bought online for Girl Charlee that I was willing to sacrifice for my toile. About an hour later my experiment was over.


All in all this was a very successful experiment, though I should have sized down to a size 16, and not used the size 18 that I had cut out for my non-stretchy fabric. The dress is clearly too big and also a bit long. I added 10" to the length which is a bit too much - so next time I'll chop off an inch. I think next time I'll just downsize overall to a size 16 - I was thinking about grading out to an 18 at the hips, but I don't think it's necessary. I won't be wearing this dress out of the house as it looks and feels quite "sloppy" but it kinda feels like a nice PJ dress...cozy.


I've bought myself a nice wool blend from Tessuti and am keen to make myself another Linden Sweaterdress ASAP - especially now that winter seems to have finally arrived in Sydney. Brrr...


-----

Pattern: "Linden Sweatshirt" by Grainline Studios
Size: 18
Modifications: lengthened hem by 10"; sleeves shortened by 1", added 1cm to the width of the neckband
Fabric:  Some weird ponti-esque type fabric from girlcharlee.com
Changes for next time: size down to a size 16 and add 9" to the length.

Tuesday 21 June 2016

Polymer Clay Jewellery Class

I've attended yet another craft class! I'm sure the basics of making beads out of Polymer Clay is something that can easily be self-taught at home, but I love a class and embrace most opportunities to dabble in something new. And, like most crafty and arty endeavors it's not as simple as it seems!

I took this class at Workshop in Redfern - a large workshop space (as the name suggests) that offers a variety of different workshops - crafty and otherwise.  I wear a necklace every day so love the idea of being able to make my own, in colours that match items in my wardrobe.

The class was really fun, and ran over three hours which is just long enough to get the basics covered. The class taught by Therese Lyons who runs Ena + Albert, an online treasure trove of all things polymer. Therese was a very lovely, patient teacher and seem genuinely impressed by some of the stuff we were turning out.

sample beads + finished necklaces by our teacher
During the class we were taught how to condition the clay, about mixing colours and different colouring techniques, shaping the beads and how to add texture and marks to our clay. I love how the tray below highlights everybody's different creative take on the task at hand...we were all "taught" the same techniques but we all came up with something different.

the tray of baked beads from my table - so pretty!
...and here is my creation below. It's quite...pink, which was not what I walked into the workshop intending to make. The pink just kind of happened all of its own accord.


When I got home I decided that my necklace didn't look quite right, so I removed the big chunky bead from the middle and the two oblong beads towards the top...and now I LOVE it! I've worn it three times already, and in fact I'm wearing it at work today.


I've made one attempt since the class at making my own beads at home and I have to say I found it really hard to narrow down an idea of what to make as the possibilities are literally endless!

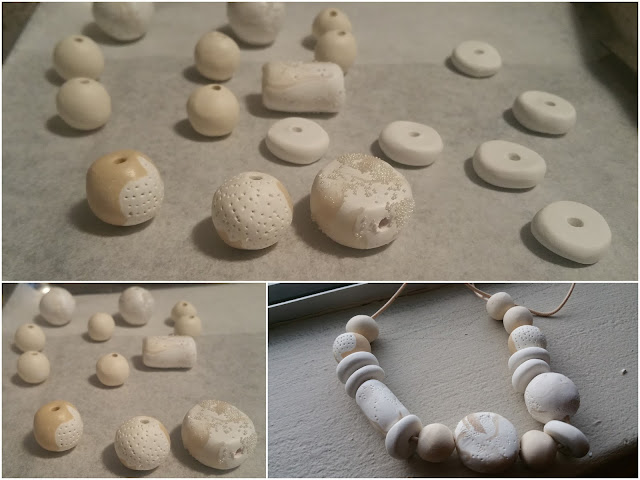
In the end I decided to "borrow" an idea from our teacher -- natural colours mixed with a translucent clay and microbeads. So...this is where years of practice obviously come in handy...a few of my beads cracked (I didn't let them cool before playing around with them), my microbeads all fell off and every bead is a different shape even when I intended quite a few to be the same. All that aside, it still looks quite good but it's a bit heavy for me (Iris Apfel I am not) so it's been gifted to a colleague who seems happy with it.


I love the idea of being able to make beads to match things I am sewing. I have a black and white dress in the pipelines so I'm also thinking of jewellery ideas to go with it...something with red maybe?

Monday 20 June 2016

(another) Linden Sweatshirt

I initially saw this fabric on the Tessuti Instagram feed, made up in a Mandy Boat Tee...and I HAD to have it (the fabric and the top). When I fondled the fabric in store it wasn't very stretchy so needless to say when I tried to make my own Mandy Boat Tee the sleeves were SO tight it was unwearable. I'm not sure why I even attempted this as I knew it wouldn't fit. Derp.  I tried to rescue it by adding a gusset under the sleeve but the fabric was too bulky, and a first for me - the overlocker ate a hole in it. Nooooooooooooo!

I was able to reuse the front of the top to make the sleeves of a Linden Sweatshirt and as luck would have it a subsequent revisit to Tessuti nabbed me a 1m remnant of this very same fabric! I was initially looking for something contrasting so it was massive luck that I was able to make a sweatshirt entirely from this amazingly fun fabric.


My previous Linden's (excluding my first wearable toile) have all been in a Size 16 however for this version I went up to a Size 18 to ensure the thing would fit due to the fabrics lack of stretch...and it does...and it's very comfortable. I shortened the sleeves by 1" and added 2" to the hem length.

I decided to go a bit funky with the hem back and do a high-low/split hem situation. I feels this elevates the top from "just a sweatshirt"...like, maybe I could wear it to work?  The hem band was actually very tricky, and despite basting it down it still does not *quite* meet up at the side seams. There is a tutorial on the Grainline website if you're keen to try this yourself.


The neckband is always a "hold your breath" moment for me as it so much can go wrong...normally, things just get stretched out and it's game over for the garment. I'm pleased to report all went well. Before I sewed the neckband on I pinned it to the neck to check the length. I ended up having to add 7" to the length (so had to cut a new neckband) - sort of expected as the fabric has such a small amount of stretch. I also added 1cm to the width of the fabric...it makes the neckband a bit easier to handle.


....and the back....


So all in all I really love this sweatshirt. The fabric is very cool, it fits well and is comfortable. I did notice something weird with the fabric though - when pulled hard the front and back of the fabric sort of stretches and separates so I'll have to be careful when wearing and washing it.

I have a bit of this fabric left over...enough for the front panel of a Linden, so if I find a nice contrasting fabric there'll be another Linden in future.
---

Pattern: "Linden Sweatshirt" by Grainline Studios
Size: 18
Modifications: lengthened hem by 2"; sleeves shortened by 1", added 1cm to the width of the neckband (plus 7" in length) and tried the "split hem" variation.
Fabric:  Polyester/Elastane textured printed stretch knit from Tessuti (sold out)
Changes for next time: none.

Friday 10 June 2016

Floral Mandy Boat Tee

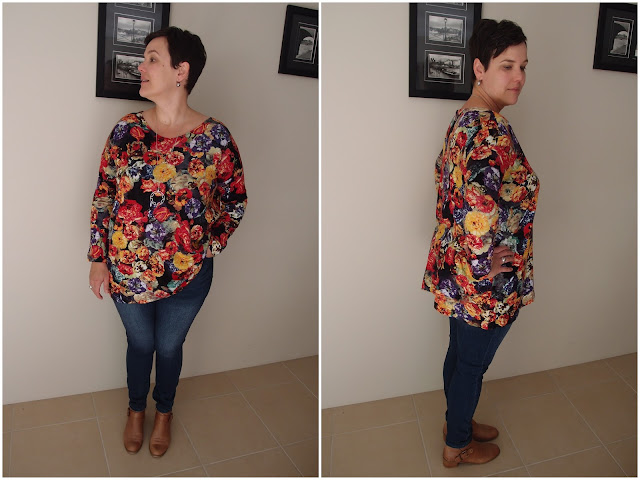
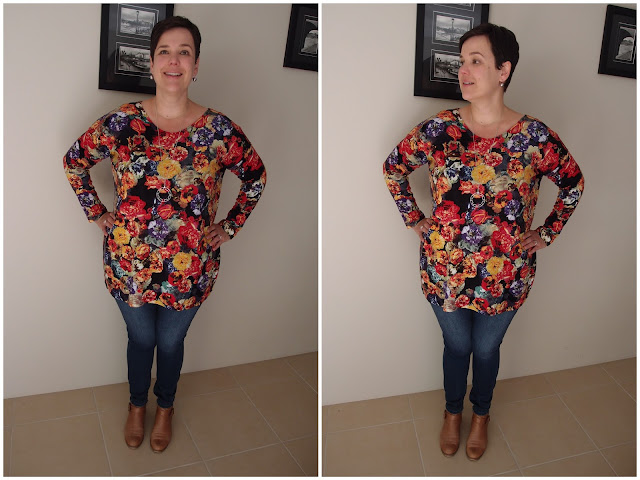
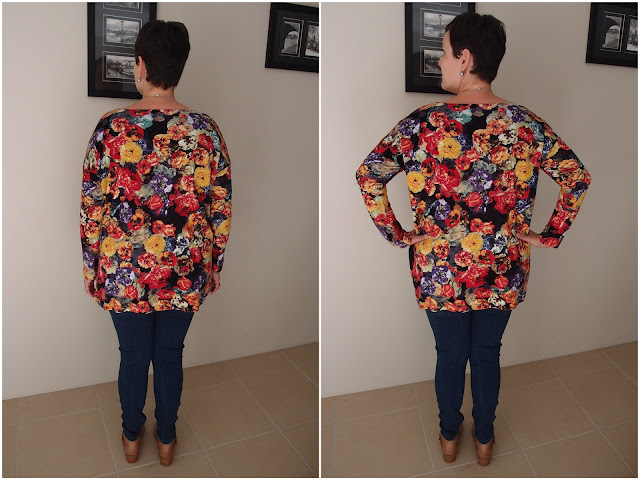
I've gone ahead and lengthened the sleeves of Tessuti's Mandy Boat Tee in order to make myself a more winter appropriate top (not that winter has really showed its face in Sydney yet...but surely it's coming)? 

The fabric is a very floral, bright, colorful, non-wintry, drapey ponti-like fabric from My Hung in Parramatta. It was $6.50/pm and I initially bought it for a Gabby Dress but somehow didn't buy enough.


After trying my other Mandy Boat Tee on I measured that I'd need an extra 13cm to make the sleeves full length -- allowing for a 2cm hem.  The sleeve length is pretty spot on which is great.


However, (there's always a "however" with my sewing) I've obviously put on weight as the sleeves are a bit tight where the top joins the sleeve; and if I do this again I need to make the sleeve wider the whole way down the arm as I don't want the sleeve to be so body hugging. I also need to take a bit away from the arm hole on both the back and front piece - maybe a 1cm on each. That extra 2cm will make things more comfortable for sure. 


After I finished sewing the top I popped it in the wash (as I do with most of my makes) and I gave the sleeves a goodstretch when wet and now they fit OK. I actually do this with a lot of my ponti garments, especially pants as they tend to loose length somewhere in the washing machine.  Bizarre.

I wore this top out today and it was pretty comfortable - though it does tend to slide backwards off my shoulders like everything does. Choke alert. Stretching out the sleeves when wet was a good idea as it's made the top wearable...it was heading to the Vinnie's pile but has been given a reprieve.

---

Pattern: Mandy Boat Tee by Tessuti
Size: One size fits...most
Modifications: lengthened hem by 6cm and sleeves by 13cm, and the sleeves/arms have been made bigger for me a sewing class I did at Tessuti.
Fabric: Knit from My Hung in Parrmatta
Changes for next time: need to make the arm hole bigger (scoop out 1cm from bottom of front + back piece, made sleeve wider by 1cm on each side and make sleeve wider the whole way down to the wrist/elbow).

Sunday 5 June 2016

Brooklyn Coat #2

As promised, here is my second attempt at the Brooklyn Coat, this time in the recommended fabric, boiled wool, and it's worked so much better than my first attempt.

**These photos are not great. It's been raining cats and dogs all weekend in Sydney and it's so DARK outside. Couple that with a black coat and well, the evidence speaks for itself.


I made a few changes to this one - reduced the hem and sleeve length by 1", added 1.5cm to the collar height, added about 1cm to the back fold (and consequently to the collar piece) and I moved the pockets forward about 1.5". I also sewed the side seams up with a slightly larger seam allowance (which I realize negates the addition of 1cm to the back fold).  All of this has resulted in a much nicer looking coat, though the sleeves are still a tad big.


Can I just say that sewing these "overlapping seams" is not easy. More than a few times I had to unpick dodgy seams and try again. It's difficult to sew right in the middle of the 3/8" overlap! Unpicking boiled wool is hard; and the dye from the fabric rubbed off on to my hands (a lot) so by the end my hands were black.


I think the pocket looks much nicer in the boiled wool fabric...though I do prefer the interior pockets of the Sydney Jacket (probably as less precise sewing is required and they still look good). Moving them forward has really made a difference - I can comfortably get my hands in them and they will be used for sure.


On my previous made I couldn't be bothered sewing the sleeve cuff; and I wasn't going to do it on this one either as I actually HATED sewing this coat due to the fabric (it has a funny chemical smell to it, had a hole in it that I found during my cutting out and had shocking dye rub off). In the end I deiced to just finish the coat so I can see how the sleeve cuffs work. I'm glad I did as this little "finishing touch" has really made the coat grow on me.


I think I'd like to save my penny's and buy some really nice quality boiled wool for another of these...maybe that's a goal for 2017.

-----

Pattern: "Brooklyn Coat" by Tessuti
Size: XL, sewn with 3/8" seam allowance
Modifications: Reduced the hem and sleeve length by 1", added 1.5cm to the collar height, added about 1cm to the back fold and collar piece, moved the pockets forward about 1.5". I also sewed the side seams up with a slightly larger seam allowance.
Fabric: Boiled wool from Pitt Trading
Changes for next time: I'm not really sure. I did try on the smaller size again in Tessuti and it did fit well. Maybe I should sew that size, just add a bit more width at the back fold?