Pages

Wednesday 16 December 2015

My Top 5 for 2015

When I looked through my makes for this year I've had quite a few successes. Go me! Of course not of all the fails ended up on the blog - most of them ended up in the bin actually - but they are firmly etched in my memory!

So here we go, my top 5 for 2015

Lady Skater Skirts 


For something so simple, these skirts would easily have to be my current favourite make.  Since finishing these I've worn two of them to death (they even came on a mini-break to Brisbane with me).  One I don't love so much (the one on the right here) as the elastic is not my preferred "comfy elastic" and another I scarified as I wanted the elastic from it to make the skirt on the left. Whilst the bodice of the Lady Skater Dress is still a bit iffy on me - the bottom half of the pattern makes a GREAT skirt. More please!

Grey Linden Sweater 
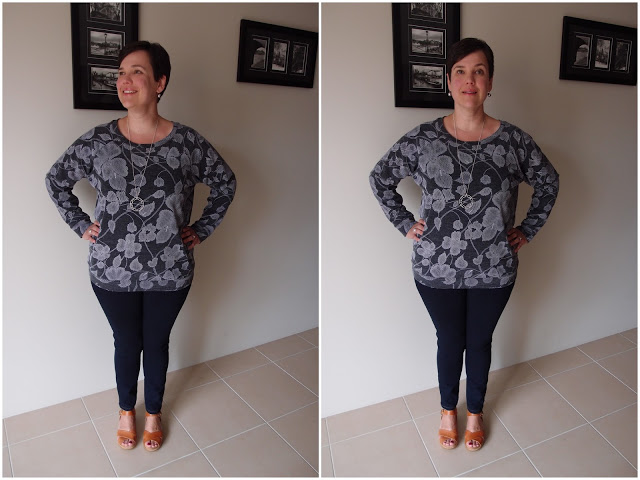


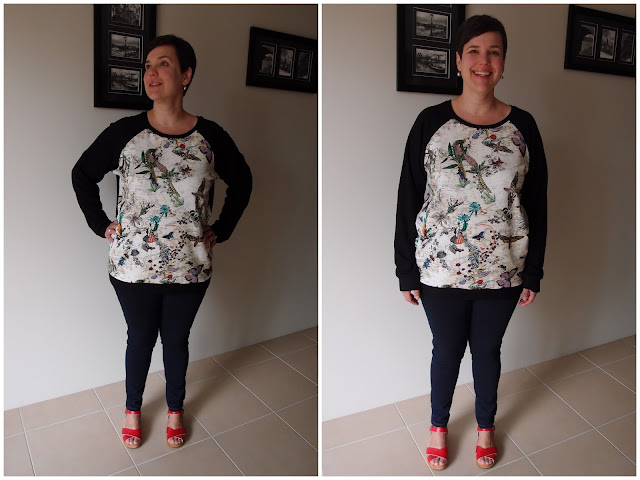
I've made four Linden Sweaters thus far as this one is my favourite to date. I'm not sure why I love it so much -- I haven't even worn it yet, but it's a combination of the fabric and finally getting the length right on the sleeves and the jumper. It's coming with me to Japan and hopefully I'll get a lot of wear out of it.

I'm not sure if I'll pack my Butterfly Ponti Linden (too long) - but it should get an Honourable Mention for having such a pretty front panel.


Frocktails Gabby Dress


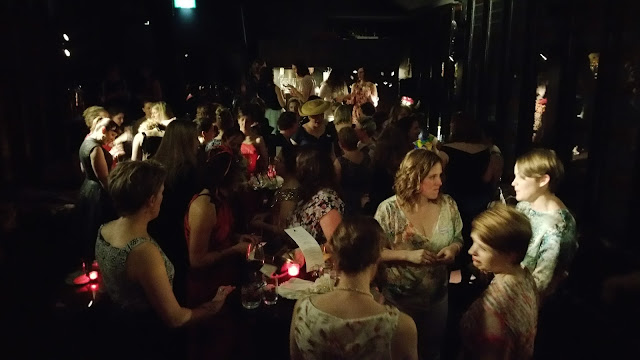
I've made a few Gabby Dresses this year and most of them have worked out quite well - I've had great success with installing neckbands which is a bit sewing win for me (the only ones that didn't work was when I tried to forgo the neckbands and just turn the neck under). I finally realised it's OK to go down a size and actually make a dress that fits properly rather than just sewing ginormous seams. This is a very simple dress but I think the patterned ponti, jewelry and cute shoes made it a winner for me for Frocktails.  Comfy/fancy = winning.

Sydney Jacket 


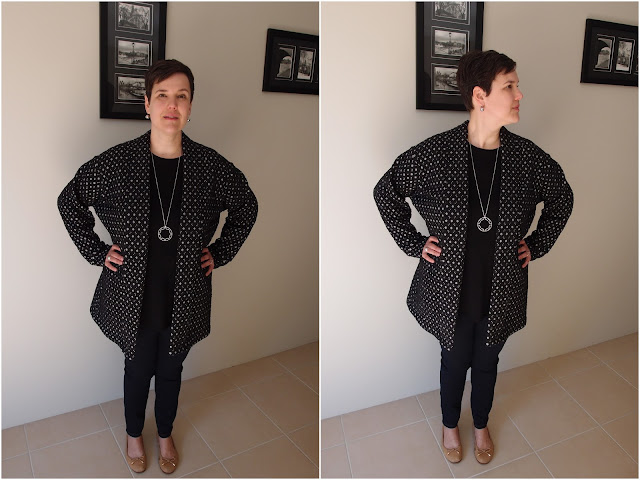
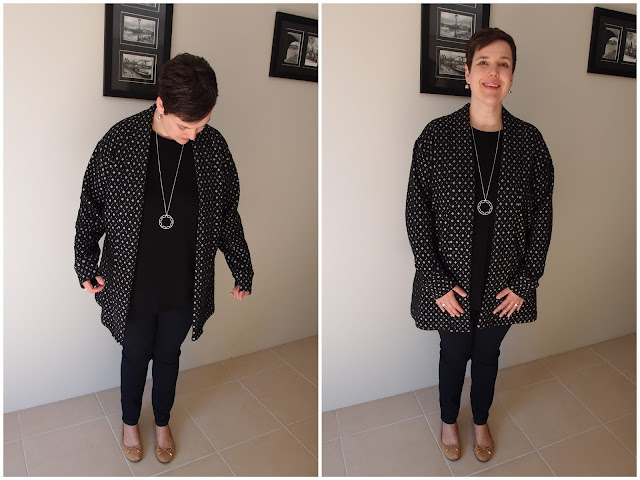
I feel very proud of this make, but also very mad at myself for trying to skrink it in a hot wash and sort of f**king up the fabric. Derp. The Sydney Jacket really is quite simple but I thought I've had oodles of trouble - there's pockets, overlapping seams and all kids of funny business going on, but I conquered this and feel quite stylish when I wear it. I have another one in mind for next winter using some fabric from Le Stash.

Mabel Skirts


I've made so many of these skirts now that I've lost count, but (despite the last Mabel fail) it's one of my most used patterns. I LOVE the leopard print skirt on the right -- it gets worn VERY often!

Mandy Boat Tee  


This is actually Item #6 (or #7 if you also count the Butterfly Linden), but I'm going to give an Honourable Mention to this mandy boat tee that I made it a thicker fabric and have worn as a jumper. I'm not 100% sure that I love it as my faffing with the neckline on the pattern has resulted in it being a bit of a funny shape in this area and the sleeves are a bit snug as the fabric is not THAT stretchy, but I love the cuffs and the length and it was worn A LOT this winter. Sadly I think I shrunk this in the dryer by mistake so I'm not sure if it'll still be around in 2016.

And that my friends is the end xox

Monday 23 November 2015

Two more Lady Skater Skirts. That'll do pig!

I've busted out two more Lady Skater Skirts over the weekend - I probably need to stop now otherwise I'll have 55 more of these before the month is out!

I'm a bit under the weather so instead of my pretty self all dressed up in my latest makes you get "floor flat-lay" which I believe is quite the thing with all the young fashion bloggers these days (and sick 40 something year old sewing bloggers).


I found this fabric at Lincraft recently and bought it specifically for this skirt (I also have another piece in the stash for a shift dress). The elastic is 5cm thick, bought from Tessuti. This elastic is not as soft (so not as comfortable) as the elastic from the Remnant Warehouse used on my last Lady Skater Skirt. I used this elastic on my Butterfly Ponti Mabel (that I've only worn once as the waistband bugs me and feels a bit sweaty on a hot day).  The overlocker also skipped a few stitches whilst attaching the waistband and I guess that's also due to it being a bit more...stiff. The hem is rolled on the overlocker, same as before!

Verdict = I like this skirt, but I don't love it like I love my other floral Lady Skater Skirt as it's not as comfortable and the fabric is not as "floaty". That said I wore it out of the house today and it served its purpose.


This fabric was bought at Tessuti well over a year ago and is a swimsuit fabric that I intended to use for a swimsuit class (that I obviously never went to).  I think it might be Tigerlily, but I'm not sure.  I figured sewing swimsuits is not in my distant future SO I sacrificed this for another skirt.


I LOVE this skirt - the fabric is so pretty and I love that it has Australian flora printed on it (I have Kangaroo Paws right below my lady garden - what could be better than that)? The fabric is quite drapey and has a bit of a shine to it. The fabric really works as a skirt (I wasn't sure how swimsuit fabric would work as a pierce of "dry land" clothing), but as a dress it would be sweat city. I'm liking the idea of wearing this sort of fabric as a floaty skirt with a cotton t-shirt for summer; a departure from my usual summer garb of knit dresses made from not-so-breathable fabric.

I haven't rolled the hem on this...I'm not sure if I will as it hangs so nicely left as is. I just have to be careful that the sides don't unravel as I cut the overlocker threads too short to sew back in.


I'm looking forward to wearing both of these makes over summer, but especially this second one.

Pattern: "Lady Skater Skirt" by Kitschy Coo
Size: 8, sewn with 3/8" seam allowance
Modifications: elastic waistband and skirt piece lengthened by 7.5cm
Fabric: as mentioned above
Changes for next time: nothing

Sunday 15 November 2015

Grey Linden Sweater

Yes yes, another Linden! I wasn't 100% happy with my last Linden so I wanted to make another one so I have options for what to pack on my upcoming holiday to Japan.


I really like this make, well as much I ever like anything I make. This time I removed all the additional length I had added to previous versions (which was about 5cm) and added back 3cm to the length. I also removed 1" from the sleeve length. I think both of these small changes have worked out quite well - the sleeves are a much more normal length now!


The fabric is from The Remnant Warehouse - somewhere I don't go very often as it's a bit of a schlep from my house.  It's a poly/viscose/elastane knit that feels a little bit like wool so I thought it would be warmer than the butterfly ponti Linden for Japan.  The price was great at $12/pm - bargain!  The white print on the fabric feels like puffy paint and is raised up off the material. I had to iron this with a pressing cloth (translation: a chux cloth) as otherwise the iron would've melted my fabric! I also sewed in all my overlocking tails so I'm getting much more neat with my sewing - go me.


I got a bit lazy with the sleeve band and didn't want to add it "in the round" after I'd sewn up the sleeves as it's a bit of pain and things do tend to get a bit stretched out of shape. This time I sewed them onto the end of the sleeves before I sewed the sleeves up. I think it's worked out fine, but I can feel the exposed seam on the inside of wrist (where as with the other method the seams are all nicely sandwiched between the two pieces of material).


After extolling the virtues of the Linden neckband in my last post I had a bit of trouble with this one. It turned out it was too short for the sweater (no idea why as the fabric is pretty stretchy) and I had to unpick my overlocking (or the 3/4 of this that I had done) - there goes a good 90 minutes of my life I'll never get back. I then recut a longer neckband (added about 3cm) but I think it could be smidge tighter - as evidenced by it lifting up on the shoulder. I also added 1cm to the width of the neckband just so I had a bit more width to play with.


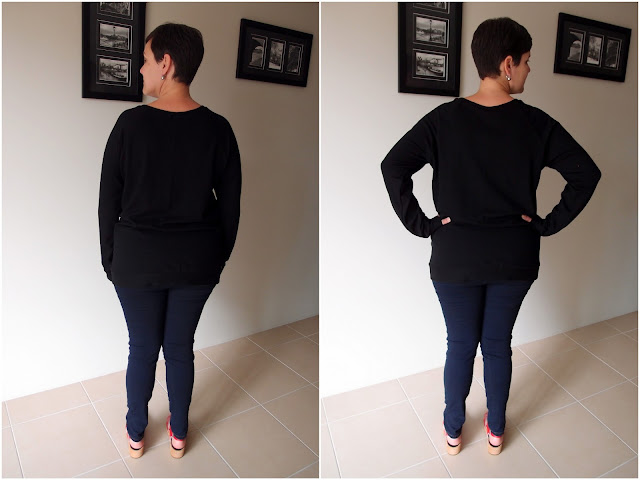
...and the view from the back...sufficient butt coverage I think...


The Linden is such a great pattern and the possibilities from changing it up each time are endless. I could've had contrasting sleeve/neck/hem bands this time, but also really wanted a sweater that was 100% the same all over. I'd like to go a bit fancy next time and use some lace on the front panel somehow.

----

Pattern: "Linden Sweatshirt" by Grainline Studios
Size: 16
Modifications: lengthened by 3cm; sleeves shortened by 2.5cm, different method of attaching sleeve bands
Fabric: Knit from The Remnant Warehouse
Changes for next time: none.

Sunday 8 November 2015

Floral Lady Skater Skirt

After the success of my experimental Lady Skater Skirt I was dead keen to make myself another skirt asap, this time with the added length I think the skirt needs on me.  I'm pretty happy with the way this turned out...I finished it on Sunday morning and wore it out to Sydney Spoolettes lunch/movie outing that afternoon.


The fabric is a soft, floaty Nylon/Elastane from Parramatta Lincraft. I randomly popped in there recently after months of avoiding the place as it was always a messy, depressing pigsty. Well, I'm pleased to report that things have changed. The fabric section is tidy (not a bolt of fabric rolling around on the floor anywhere) and they have quite a few nice pieces if you poke around a bit. I picked up 1.5m of this very pretty fabric with this skirt in mind.


Like the previous version of this skirt, there's not much to report. The skirt has a rolled hem, 5cm elastic waistband and just two pieces - a front and a back. With cutting out and faffing around with the overlocker setting it probably took 90 minutes from go to finish.


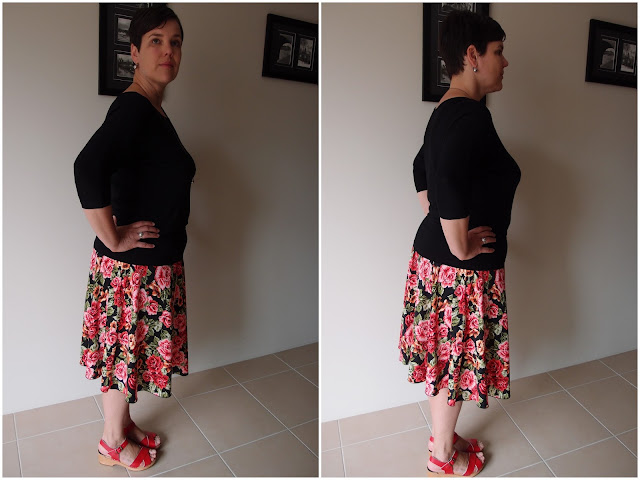
I lengthened this version by 5cm and I like it much better. It definitely sits much better at the back now that it has a bit more length though it is still a bit higher at the back...due to the butt factor!


And the best part of all - this skirt looks GREAT with my new red clogs which is what sewing is all about really...making clog-worthy outfits.


Here is a little snapshot from the skirts first outing - with the Sydney Spoolettes - for lunch at Jamie's Italian in Parramatta followed by an afternoon viewing of the Australian movie, The Dressmaker. A great movie - typically Australian in many ways, and so enjoyable.


---

Pattern: "Lady Skater Skirt" by Kitschy Coo
Size: 8, sewn with 3/8" seam allowance
Modifications: elastic waistband and lengthened by 7.5cm
Fabric: 80% Nylon, 20% Elastane from Lincraft Parramatta
Changes for next time: nothing

Saturday 7 November 2015

Butterfly Ponti Linden Sweatshirt

I've never been one to sew anything for a holiday, let alone consider wearing "me-made" whilst gallivanting across the globe. So this sweater is a bit of a first for me - sewn specifically with my upcoming Japanese Christmas holiday in mind.  I gave myself a lot of time to make this as I never understand people who want to sew a complete holiday wardrboe 3 days before they're due to fly out. Too. Much. Stress!

Now that it's finished I'm not sure I'm going to take it...but, that's not the point.


The front panel of this Linden Sweatshirt is sewn with the leftover piece of butterfly ponti from my recent Mable Skirt of doom - I'm glad I had a decent remnant leftover as the fabric is just so pretty. The rest of the sweatshirt (or jumper as we say here Down Under) is simple black ponti from Tessuti. Something I pretty much always have in the stash.


The last time I sewed the Linden I added 1" to the length as I felt it was a bit short for me to wear with slim jeans. This time I added another inch as I felt it still needed a bit of length...now I kinda think it's a bit long. Opinions welcome!


...and from the back. Much butt coverage, but I'm not 100% sure it's the right length (hence my uncertainty if it'll get a spot in the suitcase for the Japan trip).


The sleeves on the Linden are REALLY long...like Gorilla-arm long. I had meant to remove a bit of the length but forgot in my haste to get sewing (d'oh) so I'll need to be careful that my sleeves aren't dragging in my ramen. The overly long sleeves makes this jumper feel a bit...sloppy for me.


I'm pretty pleased with the neckband on this make - though it's not quite centered at the back (what I can't see can't hurt me, right)? I'm always anxious sewing on a neckband, especially "in the round", but I find the drafted length of the Linden neckband to be perfect. Just tight enough to pull the wide neck in, but not so tight that it feels like you're stretching the bejesus out of it whilst sewing it on. I haven't top-stitched the neckband down as after a good iron it's staying put. I'll throw this into the wash and see if that's still the case.


...and that's all she wrote folks.


Pattern: "Linden Sweatshirt" by Grainline Studios
Size: 16
Modifications: lengthened by 2" or 5cm
Fabric: Ponti (again) from Tessuti (again)
Changes for next time:SHORTEN THE SLEEVES YOU NUFTY!

Thursday 5 November 2015

Lady Skater Circle Skirt

This skirt was actually meant to be a Lady Skater Dress but a fail with the neckband (me be sloppy in my sewing and not really caring about the dress as the material was looking a bit "too much for a dress") has resulted in a Lady Skater Skirt. I cannot say that I'm unhappy.


This is a pretty simple make....the skirt portion of the pattern, a 5cm elastic waistband and an overlocker rolled-hem.


I don't think there's an easier skirt I could've made. That said I did spend quite a bit of time adjusting the settings on the overlocker to get the rolled hem looking as good as I could -- it's still not 100%, with a bit of pulling/gathering down there that I hope will work itself out ASAP.  I'm paranoid about elastic waistbands being too loose...or too tight so I faffed with this for a while too.


Because I had shortened the bodice of the Lady Skater Dress previously I had already added 2.5cm to the skirt to compensate for the loss of length. I will be making this skirt again and I'm going to add more length - perhaps 5cm. As you can see from the side shot my well-sized bum is making the skirt ride up at the back...more than I find acceptable.


I thought this skirt would give "good twirl" but nope...


There's not much more to say about this make other than I'm pretty chuffed. I really like circle skirts and I've wanted to make one ever since I started sewing but my waist is pretty big so patterns didn't tend to fit me. I'm so terrible at maths I my brain melted when I had to figure out the numbers to make my own pattern, and yes, even the By Hand London circle skirt app failed me (waist too big Miss Jane)!


Pattern: "Lady Skater Skirt" by Kitschy Coo
Size: 8, sewn with 3/8" seam allowance
Modifications: elastic waistband and lengthened by 2.5cm
Fabric: some sort of knit from Addicted to Fabric (Canberra)
Changes for next time: Will add some more length to the skirt, maybe 5cm?

Saturday 24 October 2015

The Butterfly Mabel Skirt...of many tears

Well, thank God that's over! This is the skirt that almost ended in the bin!!!

As soon as I saw the email from Tessuti announcing the newest arrival of Ponti's to come in to their store I did a mad lunchtime dash via bus + very speedy walking to the Surry Hills store to make sure I could get my hands on some ponti before it all sold out (this stuff goes like hotcakes. And this is what I walked out with (well, one of the pieces anyway)...

I bought 1.3m of this Italian ponti with the view of making a Mabel Skirt. I bought a little too much to account for shrinkage but it now turns out that I have enough left over for the front panel of a Linden Sweatshirt. Yay! Not yay was the price - at $59p/m I was almost in tears when things started to go pear-shaped with this make.


I've made quite a few Mabel Skirts by now - some winners and some failures - so I don't have much to say about the pattern other than it's a great way to use just a little bit of a great...and sometimes pricey fabric. I'd just made three Mabel's in a row with NO issues and I was feeling pretty confident. Pride, as they say, always comes before a (sewing) fall.

That said this one is a bit of a fail. All was going well but the waistband must've stretched out as I was sewing as this one turned out too big...like "wardrobe malfunction" too big despite my "clear elastic sewn into the waistband trick" that has NEVER failed me before. I look glum in this photos as I hadn't figured out how to fix this.


I thought I could shrink my waistband back into submission so into a hot wash and dyer this very expensive fabric went. This did shrink the skirt...in length, but not in width. FARK!  Why are the sewing Gods so against me? So, I unpicked the waistband from the skirt and let it sit in the "very naughty corner" for a week or two. I'm not a fan of short skirts so I drafted a thicker waistband which in theory would work, but I decided to use proper, wider elastic in the waistband, not my usual clear elastic, which left everything too bulky. Back to the naughty corner...


So in the end I ended up making the waistband from some thick black elastic that I have. I was paranoid about it being a) too loose or b) too tight - always my fear with elastic waistbands.  Sewing in stressful. It worked; no trouble attaching the elastic with my overlocker (blade up so the elastic didn't get cut) BUT I did manage to melt my elastic a bit with the iron as I doing my final press so it's lost a bit of its elasticity. Honestly...you couldn't make this sh!t up if you tried.


So in the end I have a skirt from some lovely fabric, but not without a lot of stress and worry. I will wear it (as the fabric goes so well with my lovely new red clogs) but I'll always feel anxious about it when I wear it as I know it's not perfect, and that the elastic is kinda disintegrating thanks to my ironing it.


In typical "Melanie fashion" though as soon as things went belly up with this I hopped online and found some of this fabric still available for sale at a store in Tassie...so I bought 1.1m and I will make another of these when this one carks it. I'm calling in my "safety stash".

Pattern: "Mabel Skirt" by Colette Patterns
Size: XL, sewn with 3/8" seam allowance and lengthened by 15cm (and then shrunk in the wash/dryer)
Modifications: elastic waistband
Fabric: Ponti (again) from Tessuti (again)
Changes for next time: I will probably use this elastic waistband method again, it's less fiddly than what I have been doing, quicker and the elastic is pretty comfortable. Will continue to lengthen by 15cm.

Sunday 16 August 2015

Seamwork's Oslo Cardigan

When we in Melbourne last weekend for Frocktails a few of the Melbourne ladies were lovely enough to chauffeur a few of the out-of-towners around to some Melbourne fabric shops. I was very excited to tag along as I strongly strongly believe (very strongly) that Melbourne's fabric shopping game sh!ts all over Sydney's. Melbourne seems to HAVE so many great fabric shops. We visited Rathdowne, Darn Cheap Fabrics and the Cloth Shop at Ivanhoe.

It was at the famed Darn Cheap Fabric were I picked 2.5m of the fabric below, initially ear-marked for a Lady Skater Dress, but when I got it home I thought perhaps a cardigan might be better for this slightly thicker cotton/poly/spandex mix. The fabric is sort of quilted...with material on the front and back that are stuck together somehow. It's quite cozy and feels lovely to wear.


The Oslo Cardigan is one of the first patterns from Colette's Seamwork Magazine. I don't pay for a magazine subscription (if you do the patterns are free) so this pattern cost me about $6 - pretty cheap really. I bought the pattern AGES ago but bulked at putting the PDF together as it's about 1000 pages long. Like the Colette PDF patterns the page margins are 1" on each side which seems a bit...wasteful. I was sick all of last week however so had plenty of time to stick this thing together *grumble grumble*.

The pattern is an "oversized" cardigan with sleeve cuffs and a collar that goes the entire way from hem to hem. I sewed a size XL leaving the length at the 3XL as I'm tall-ish so didn't want a short short cardigan to wear with skinny pants.  It fits as expected (it fits = YAY) although I am wondering if I could size down next time...the only thing stopping me is that there is quite a big difference between each size - so going down just one size could make it too small.


There's not much to say about this make really. I read through the instructions before starting and referred to them again only when it came to attaching the collar - just to make sure I was getting things right. It was a very easy garment to sew and (for a change) I had no machine troubles so everything went swimmingly.


The pattern piece for the cuff was ridiculously long so I decided to half the length of the cuff, and even then the sleeve is still too long for my liking, but I guess that goes along with the whole "oversize" thing the Oslo has going on. Next time I will stick with my shorter cuff, but take about 1" off the sleeve piece.


The only other change I made to the pattern was to tack down the collar piece as it would not sit flat due to the bulkiness of the fabric and it was making me feel a bit messy and swamped by the garment. I put in a few machine stitches at each hem and at the back of the collar to stop it flipping up and standing at attention. I feel a lot more tidy in this cardigan now and less swapped by how big it is.

Just gotta say though that this cardigan desperately needs pockets -- how would I go about that doing you think - robbing the pockets from the Tessuti Jacket perhaps?


Back view...just for kicks. I think the cardigan does look big in this photo, but again that is the style and in a more drapey, snuggly fabric I think it would be OK? Still cannot decide if should size down or not?


...and side view...you can see how "drop shouldered" this style is...


When I first put this on my thought was "uh-oh, I've made an old man's kimono-style bathrobe" mainly due to the pattern on the fabric and how stiff the fabric makes the collar. That said, I still wore the cardigan out today for lunch and a walk in the park and whilst it is pretty comfortable I'm not sure how I feel about it, or if it's flattering. I had visions of a Metalicus type garment when I bought this fabric but I'm pretty sure I am not challenging Metalicus at all. Hmmm...


Pattern: Oslo Cardigan by Seamwork Magazine
Size: XL with the length left at size 3XL
Modifications: reduced the length of the cuff by half; stitched down the collar at the hem and back neckline to stop it flipping up.
Fabric: Cotton, Poly, Spandex from Darn Cheap Fabric
Changes for next time: add in some pockets and try it in a more "jumper-like" material. Maybe next winter though...

Monday 10 August 2015

A Gabby Dress for Frocktails

On the weekend was the long-awaited Frocktails shindig down in Melbourne (sew a frock and come drink cocktails with like-minded souls). I had been looking forward to my weekend away in Melbourne ALL year and decided to take a few extra days off work and make a real long weekend of it.  Just my luck though I came down with a cold the day after arriving in Melbourne which had escalated in to a full blown cold on the night of the party. Wah! 

After having six attempts at coming up with a wearable dress for the night there was no way I was going to miss Frocktails, so I took my Codral, gargled some aspirin and dolled myself up for the night....


You've seen this fabric before - in the toile for the Lady Skater Dress that I made recently. The fabric is a lovely ponti from Tessuti which I had always intended my Frocktails dress to be made out of (I initially bought 2m to make a Casual Lady Dress which my overlocker ate, so I made it again from the remaining 1m...which my overlocker also ate - turns out the needles needed to be changed)! The fabric is comfortable but I think the lace print makes it look a little bit fancy.


There's not a lot to say about this dress that I've not said before. I made the dress with short sleeves as I remember being SO hot at the Sydney Frocktails last year and didn't want to overheat again this year.


The dress is worn with some big, bright beads bought in Bali a few years ago.  The bag is a cheapie from Colette (matches the beads as I'm all about matchy matchy), stockings are from Sonsee, shoes from Paul Dane and the sparkly cardigan is from Sarah Jane in Newtown. The cardigan is made from wool so was warm up to race up to the venue in without donning a big coat. I was really comfortable all night and my shoes only started to hurt as I walked back to the hotel - not bad for brand new shoes.


All in all it was a great night though I only managed to stay for 3 hours before my cold got the better of me. I was a bit out of it all night and SOOOO tired so my conversational skills were really lacking which is a shame as 51 people attended and I'd only met a handful of the ladies I'd wanted to say HI too. Oh well..there's always next year...


Pattern: "Gabby Dress" by Tessuti
Size: M, sewn with 3/8" seam allowance and left at a size L at the shoulders. The hem is 1"(behold my knees people)!
Modifications: none
Fabric: Ponti (again) from Tessuti (again)
Changes for next time: none, though I think it's time to try this dress again in a woven, I have some nice soft silk/cotton that I bought in Malaysia that I'd like to bust out of the stash.